Technical Support
Articles
Delve into the latest company news, product information, technical advice and more

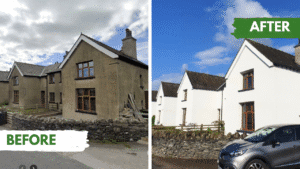
Pebbledash divides opinion. Some see it as low-maintenance and practical, others see it as dated and difficult to live with. The good news? You don’t need to remove pebbledash to upgrade your home’s appearance or performance.
In most cases, pebbledashed walls can be covered safely and effectively using one of two methods:
Both options improve kerb appeal, protect the structure beneath and in the case of EWI, can significantly improve comfort and EPC ratings.
Below, we explain each option clearly, including when it’s suitable and what to expect.
If your pebbledash is structurally sound but visually outdated, re-rendering using OCDC (One Coat Dash Cover) is often the simplest and most cost-effective solution.
Before anything is applied, the wall must be checked for stability. Tap across the surface using a hammer or shovel handle. Any loose stones or hollow-sounding areas should be removed and badly degraded sections stripped back.
This step ensures the OCDC bonds to a secure, load-bearing surface, not a failing one.
Once prepared, the wall is primed to stabilise dust and improve adhesion. This creates a reliable bond between the existing pebbledash and the OCDC dash cover render, helping to prevent cracking or delamination over time.
OCDC (One Coat Dash Cover) is applied in layers to level out the uneven surface. Thicker areas are built up first, followed by a full pass across the wall. A reinforcing mesh is embedded to improve strength and resistance to movement.
The result is a flat, uniform surface ready for decoration.
Once cured, the wall can be finished with either:
Silicone finishes are commonly chosen for their breathability, water resistance and resistance to algae and dirt build-up.
If improving energy efficiency is a priority, installing external wall insulation over pebbledash is often the best long-term solution.
Rather than removing the pebbledash, the insulation system is fixed through it and into the structural wall behind.
Before insulation is installed, the wall is assessed to confirm it can support the system. Pull-out tests are carried out to ensure fixings anchor securely into the structure behind the pebbledash.
This step is critical for safety and system longevity.
The pebbledashed wall is primed to reduce dust and improve bonding between the insulation adhesive and the substrate.
A starter track is fixed level, above the damp-proof course (DPC). This supports the insulation, ensures straight alignment and protects the base of the system from moisture and impact damage.
Insulation boards are bonded using adhesive and installed in a staggered pattern. Once cured, mechanical fixings are added to secure the boards through the pebbledash and into the wall behind.
Care is taken to keep joints tight and avoid alignment with doors and windows.
A reinforced basecoat is applied with mesh embedded throughout, followed by priming and a decorative render finish. The final appearance is smooth, modern and weather-resistant.
|
Your Priority |
Best Option |
|
Improve appearance only |
Re-render over pebbledash |
|
Improve warmth and comfort |
External wall insulation |
|
Improve EPC rating |
External wall insulation |
|
Minimise disruption |
Re-rendering |
|
Long-term energy savings |
External wall insulation |
In most cases, no. If the pebbledash is stable, it can be safely rendered over using OCDC or insulated without full removal.
When installed correctly using breathable materials, both systems protect against damp rather than cause it.
Usually no, unless the property is listed or in a conservation area. Always check with your local authority.
High-quality render and EWI systems are designed to last 25+ years with minimal maintenance.
Covering pebbledash doesn’t have to mean mess, disruption or compromise. Whether you’re refreshing the look of your home using OCDC or upgrading its energy performance with external wall insulation, modern systems make it possible to achieve a clean finish, improved comfort and long-term protection all without stripping back to bare brick.